
Performance Optimization Techniques in React: Memoization, useMemo, useCallback, Code Splitting, and Lazy Loading

Performance Optimization Techniques in React: Memoization, useMemo, useCallback, Code Splitting, and Lazy Loading

Introduction

In this blog post, we will explore various performance optimization techniques in React that can significantly improve the performance and user experience of your applications. By understanding and applying these techniques, you can minimize unnecessary re-rendering, reduce bundle sizes, and optimize resource loading. Let's dive into memoization, useMemo, useCallback, code splitting, and lazy loading to enhance the performance of your React applications.

Memoization


    const MemoizedComponent = React.memo(Component);
  

Memoization is a technique used to cache the results of expensive computations and avoid unnecessary re-computations. In React, you can leverage the `memo` higher-order component or the `React.memo` function to memoize functional components. When a memoized component receives the same props, it skips the re-rendering process, resulting in better performance. Memoization is particularly useful when rendering large lists or when components have expensive rendering logic. By memoizing components, you can optimize performance by preventing unnecessary re-renders.

Memoization

Pic Courtesy: Syncfusion

useMemo


    const expensiveResult = useMemo(() => {
      // Perform expensive computation here
      return computeExpensiveResult(dep1, dep2);
    }, [dep1, dep2]);
  

The `useMemo` hook in React allows you to memoize the result of a computation and avoid unnecessary re-computations. It takes a function and a dependency array as arguments. The function is executed during rendering, and the result is cached until any of the dependencies change. If the dependencies remain the same, the cached result is returned, saving computational overhead. `useMemo` is useful for calculating derived data or performing expensive calculations in a component. By using `useMemo` strategically, you can optimize your React components and improve rendering performance.

useMemo

Pic Courtesy: Enlear Academy

useCallback


    const handleClick = useCallback(() => {
      // Handle click logic here
    }, [dep1, dep2]);
  

The `useCallback` hook is used to memoize callback functions in React. When a component renders, functions defined within the component are re-created on each render. However, by using `useCallback`, you can memoize a function and ensure that it is not re-created unless its dependencies change. This optimization can be beneficial when passing callbacks to child components, as it prevents unnecessary re-renders of the child components. By memoizing callbacks with `useCallback`, you can improve the performance of your React application.

useCallback

Pic Courtesy: Alex Devero Blog

Code Splitting


    const LazyComponent = React.lazy(() => import('./LazyComponent'));
    const MyComponent = () => (
      <Suspense fallback={
Loading...
}> <LazyComponent /> </Suspense> );

Code splitting is a technique that allows you to divide your application's code into smaller chunks that can be loaded on-demand. By splitting your code into smaller bundles, you can reduce the initial load time of your application and improve performance. React provides different code splitting techniques such as dynamic import and React.lazy with Suspense. Dynamic import enables you to asynchronously load modules at runtime. React.lazy allows you to lazily load components, loading them only when they are needed. Suspense provides a fallback UI while the lazily loaded component is being fetched. By leveraging code splitting, you can optimize the loading performance of your React application.

Code Splitting

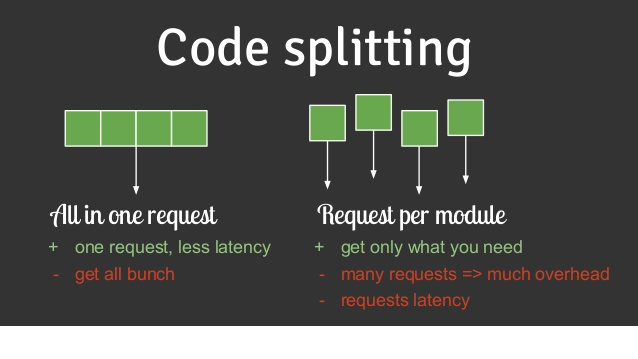
Pic Courtesy: FreeCodeCamp

Lazy Loading


    const LazyImage = React.lazy(() => import('./LazyImage'));
    const MyComponent = () => (
      <Suspense fallback={
Loading...
}> <LazyImage src="https://example.com/image.jpg" alt="Image" /> </Suspense> );

Lazy loading is a technique that defers the loading of non-critical resources until they are actually needed. In a React application, you can use React.lazy and Suspense to lazily load components. React.lazy allows you to load components lazily, and Suspense provides a fallback UI while the component is being loaded. Lazy loading is particularly useful when dealing with large applications that contain many components. By lazy loading components or resources, you can significantly improve the initial page load time and reduce the amount of data transferred, resulting in a better user experience.

Lazy Loading

Pic Courtesy: Syncfusion

Conclusion

In this blog post, we explored various performance optimization techniques in React, including memoization, useMemo, useCallback, code splitting, and lazy loading. By applying these techniques, you can optimize the rendering process, reduce bundle sizes, and enhance the loading performance of your React applications. Consider the specific requirements of your application and choose the appropriate optimization techniques to improve the overall performance and user experience.

Comments

  1. A good read overall

    ReplyDelete
  2. Every topic has been explained clearly with relevant implementations.

    ReplyDelete

Post a Comment

Popular posts from this blog

Introduction to React and JavaScript: A Beginner's Guide

Introduction to React and JavaScript: A Beginner's Guide What is JavaScript? JavaScript is a versatile programming language that plays a crucial role in web development. It offers powerful features and functionalities that enable dynamic and interactive web experiences. Some key aspects of JavaScript include: Manipulating HTML elements Handling user interactions Making network requests Performing calculations and data manipulation JavaScript is widely used across the web, from simple scripts to large-scale applications. Introduction to React React is a popular JavaScript library for building user interfaces. It simplifies the process of creating interactive components and managing application state. Here are some important aspects of React: Components: React applications are built using reusable components that encapsulate their own logic and rendering. Virtual DOM: React uses a virtual repres

Introduction to Progressive Web Apps (PWAs)

Introduction to Progressive Web Apps (PWAs) Introduction to Progressive Web Apps (PWAs) What are Progressive Web Apps (PWAs)? Progressive Web Apps (PWAs) are a new and exciting approach to building web applications that deliver an enhanced user experience. They combine the best features of both web and mobile applications, providing users with a seamless and fast experience regardless of their device or network conditions. PWAs are designed to be reliable, fast, and engaging, making them an excellent choice for developers looking to bridge the gap between web and mobile worlds. Key Features of PWAs PWAs come with several key features that set them apart from traditional web applications. Some of the essential features include: Offline Capability: PWAs can work offline or on low-quality networks, allowing users to access content even without an internet connection. Responsive Design: They are designed to adapt to different

Migrating Legacy Code from Class Components to Functional Components in React

Migrating Legacy Code from Class Components to Functional Components in React Migrating Legacy Code from Class Components to Functional Components in React Introduction React functional components, introduced with the introduction of hooks, have become the recommended approach for building components in React. However, many existing React projects still use class components. This blog post will guide you through the process of migrating legacy code from class components to functional components. We will discuss the benefits of using functional components, the step-by-step migration process, and provide practical examples and tips to make the transition smoother. Benefits of Functional Components Pic Courtesy: Codedamn Simpler Syntax: Functional components use JavaScript functions, resulting in a cleaner and more concise syntax compared to class components. Improved Performance: Functional components can leverage

Introduction to Redux Toolkit: A Powerful Redux Simplification

Introduction to Redux Toolkit: A Powerful Redux Simplification Redux Toolkit: A Powerful Redux Simplification Redux Toolkit is a powerful library that simplifies the process of managing state in Redux applications. It provides a set of utilities and best practices to streamline the development process and enhance productivity. In this blog post, we'll explore the basics of Redux Toolkit, understand its syntax, compare it with plain Redux, discuss its future, and see how it handles Thunks and direct state manipulation. We'll also provide practical examples and code snippets to solidify your understanding. What is Redux Toolkit? Redux Toolkit is an official package from the Redux team that provides a set of utilities to simplify the common tasks of Redux development. It is designed to be the standard way to write Redux logic and aims to reduce boilerplate code while making the codebase more maintainable. Basic Syntax of Redux Toolkit

Exploring Different Concepts in React

Exploring Different Concepts in React Exploring Different Concepts in React React Fiber React Fiber is a reimplementation of the React reconciliation algorithm that was introduced in React 16. It is responsible for scheduling, rendering, and updating components in React. Fiber introduces a new approach to handle component updates and enables React to break rendering work into smaller units known as "fibers." This allows React to perform work incrementally and prioritize updates to provide a better user experience, including smoother animations, responsiveness, and the ability to pause and resume rendering work. Diffing Algorithm The diffing algorithm is a core concept in React that optimizes the process of updating the user interface. When a component's state or props change, React compares the previous virtual DOM (a JavaScript representation of the actual DOM) with the new virtual DOM to determine t

Advanced Redux Toolkit Concepts 2

Advanced Redux Toolkit Concepts: createSlice, Middleware, and Immer Integration Advanced Redux Toolkit Concepts In the previous posts, we explored some advanced concepts in Redux Toolkit, such as RTK Query, createAsyncThunk, and createEntityAdapter. Now, let's take it a step further and discover more powerful features to enhance your Redux development experience. createSlice: Simplified Slice Creation When working with Redux, creating action types, action creators, and reducers can be repetitive and prone to errors. However, Redux Toolkit introduces the createSlice function that simplifies slice creation. With createSlice , you can define a set of action types and action creators without writing boilerplate code manually. The createSlice function also generates the corresponding reducer automatically, streamlining your Redux setup and reducing development time. To use createSlice , simply define an objec

Advanced Concepts in Redux Toolkit

Advanced Concepts in Redux Toolkit: RTK Query, createAsyncThunk, createEntityAdapter Advanced Concepts in Redux Toolkit RTK Query RTK Query is a powerful data fetching library built on top of Redux Toolkit. It simplifies the process of making API requests and managing data in a Redux store. RTK Query provides a set of utilities to define and manage API endpoints and automatically handles fetching, caching, and state updates for you. With RTK Query, you can define an API slice that specifies your API endpoints and their methods. The library generates corresponding actions and reducers, enabling seamless data fetching and caching. Here's a basic example of using RTK Query: // apiSlice.js import { createApi, fetchBaseQuery } from '@reduxjs/toolkit/query/react'; export const apiSlice = createApi({ baseQuery: fetchBaseQuery({ baseUrl: '/api' }), endpoints: (builder) => ({ getUsers: builder.query({

JavaScript Array Methods: map, forEach, filter, reduce, and More

JavaScript Array Methods: map, forEach, filter, reduce, and More JavaScript Array Methods: map, forEach, filter, reduce, and More Introduction JavaScript provides several built-in methods for working with arrays. These methods offer powerful functionalities to manipulate, iterate, and transform arrays. In this blog post, we will explore some of the most commonly used array methods, including `map`, `forEach`, `filter`, `reduce`, and more. Understanding these methods will help you write concise and efficient code when dealing with arrays in JavaScript. The `map()` Method The `map()` method creates a new array by applying a function to each element of an existing array. It allows you to transform the elements of the array based on some logic defined in the mapping function. The result is a new array with the same length as the original array. // Example using the map() method const numbers = [1, 2, 3, 4, 5]

Advanced Concepts in Redux: Middleware, Reselect, and Immutable.js

Advanced Concepts in Redux: Middleware, Reselect, and Immutable.js Advanced Concepts in Redux: Middleware, Reselect, and Immutable.js Introduction In this blog post, we will explore advanced concepts in Redux that enhance its capabilities. We'll dive into middleware, asynchronous actions with Redux Thunk, managing side effects with Redux Saga, memoized selectors with Reselect, immutability with Immutable.js, Redux middleware for error handling and logging, and advanced Redux DevTools features. Understanding and applying these concepts will help you build more efficient and maintainable Redux applications. Middleware Middleware in Redux provides a way to intercept and augment actions before they reach the reducers. It enables you to add cross-cutting concerns, such as logging, error handling, or performing asynchronous operations. Middleware sits between the dispatching of an action and the moment it reaches the reducers. It