
Performance Optimization Techniques in React: Memoization, useMemo, useCallback, Code Splitting, and Lazy Loading

Performance Optimization Techniques in React: Memoization, useMemo, useCallback, Code Splitting, and Lazy Loading

Introduction

In this blog post, we will explore various performance optimization techniques in React that can significantly improve the performance and user experience of your applications. By understanding and applying these techniques, you can minimize unnecessary re-rendering, reduce bundle sizes, and optimize resource loading. Let's dive into memoization, useMemo, useCallback, code splitting, and lazy loading to enhance the performance of your React applications.

Memoization


    const MemoizedComponent = React.memo(Component);
  

Memoization is a technique used to cache the results of expensive computations and avoid unnecessary re-computations. In React, you can leverage the `memo` higher-order component or the `React.memo` function to memoize functional components. When a memoized component receives the same props, it skips the re-rendering process, resulting in better performance. Memoization is particularly useful when rendering large lists or when components have expensive rendering logic. By memoizing components, you can optimize performance by preventing unnecessary re-renders.

Memoization

Pic Courtesy: Syncfusion

useMemo


    const expensiveResult = useMemo(() => {
      // Perform expensive computation here
      return computeExpensiveResult(dep1, dep2);
    }, [dep1, dep2]);
  

The `useMemo` hook in React allows you to memoize the result of a computation and avoid unnecessary re-computations. It takes a function and a dependency array as arguments. The function is executed during rendering, and the result is cached until any of the dependencies change. If the dependencies remain the same, the cached result is returned, saving computational overhead. `useMemo` is useful for calculating derived data or performing expensive calculations in a component. By using `useMemo` strategically, you can optimize your React components and improve rendering performance.

useMemo

Pic Courtesy: Enlear Academy

useCallback


    const handleClick = useCallback(() => {
      // Handle click logic here
    }, [dep1, dep2]);
  

The `useCallback` hook is used to memoize callback functions in React. When a component renders, functions defined within the component are re-created on each render. However, by using `useCallback`, you can memoize a function and ensure that it is not re-created unless its dependencies change. This optimization can be beneficial when passing callbacks to child components, as it prevents unnecessary re-renders of the child components. By memoizing callbacks with `useCallback`, you can improve the performance of your React application.

useCallback

Pic Courtesy: Alex Devero Blog

Code Splitting


    const LazyComponent = React.lazy(() => import('./LazyComponent'));
    const MyComponent = () => (
      <Suspense fallback={
Loading...
}> <LazyComponent /> </Suspense> );

Code splitting is a technique that allows you to divide your application's code into smaller chunks that can be loaded on-demand. By splitting your code into smaller bundles, you can reduce the initial load time of your application and improve performance. React provides different code splitting techniques such as dynamic import and React.lazy with Suspense. Dynamic import enables you to asynchronously load modules at runtime. React.lazy allows you to lazily load components, loading them only when they are needed. Suspense provides a fallback UI while the lazily loaded component is being fetched. By leveraging code splitting, you can optimize the loading performance of your React application.
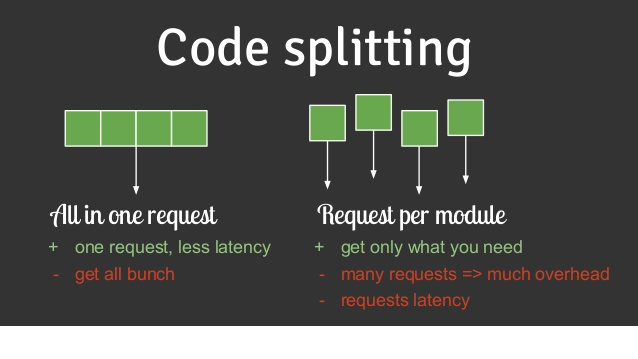
Code Splitting

Pic Courtesy: FreeCodeCamp

Lazy Loading


    const LazyImage = React.lazy(() => import('./LazyImage'));
    const MyComponent = () => (
      <Suspense fallback={
Loading...
}> <LazyImage src="https://example.com/image.jpg" alt="Image" /> </Suspense> );

Lazy loading is a technique that defers the loading of non-critical resources until they are actually needed. In a React application, you can use React.lazy and Suspense to lazily load components. React.lazy allows you to load components lazily, and Suspense provides a fallback UI while the component is being loaded. Lazy loading is particularly useful when dealing with large applications that contain many components. By lazy loading components or resources, you can significantly improve the initial page load time and reduce the amount of data transferred, resulting in a better user experience.

Lazy Loading

Pic Courtesy: Syncfusion

Conclusion

In this blog post, we explored various performance optimization techniques in React, including memoization, useMemo, useCallback, code splitting, and lazy loading. By applying these techniques, you can optimize the rendering process, reduce bundle sizes, and enhance the loading performance of your React applications. Consider the specific requirements of your application and choose the appropriate optimization techniques to improve the overall performance and user experience.

Comments

  1. A good read overall

    ReplyDelete
  2. Every topic has been explained clearly with relevant implementations.

    ReplyDelete

Post a Comment

Popular posts from this blog

Advanced Concepts in Redux Toolkit

Advanced Concepts in Redux Toolkit: RTK Query, createAsyncThunk, createEntityAdapter Advanced Concepts in Redux Toolkit RTK Query RTK Query is a powerful data fetching library built on top of Redux Toolkit. It simplifies the process of making API requests and managing data in a Redux store. RTK Query provides a set of utilities to define and manage API endpoints and automatically handles fetching, caching, and state updates for you. With RTK Query, you can define an API slice that specifies your API endpoints and their methods. The library generates corresponding actions and reducers, enabling seamless data fetching and caching. Here's a basic example of using RTK Query: // apiSlice.js import { createApi, fetchBaseQuery } from '@reduxjs/toolkit/query/react'; export const apiSlice = createApi({ baseQuery: fetchBaseQuery({ baseUrl: '/api' }), endpoints: (builder) => ({ getUsers: builder.query({ ...

JavaScript Array Methods: map, forEach, filter, reduce, and More

JavaScript Array Methods: map, forEach, filter, reduce, and More JavaScript Array Methods: map, forEach, filter, reduce, and More Introduction JavaScript provides several built-in methods for working with arrays. These methods offer powerful functionalities to manipulate, iterate, and transform arrays. In this blog post, we will explore some of the most commonly used array methods, including `map`, `forEach`, `filter`, `reduce`, and more. Understanding these methods will help you write concise and efficient code when dealing with arrays in JavaScript. The `map()` Method The `map()` method creates a new array by applying a function to each element of an existing array. It allows you to transform the elements of the array based on some logic defined in the mapping function. The result is a new array with the same length as the original array. // Example using the map() method const numbers = [1, 2, 3, 4, 5]...

Best Practices for Optimizing Website Performance

Best Practices for Optimizing Website Performance Best Practices for Optimizing Website Performance Website performance is crucial for providing a positive user experience and keeping visitors engaged. Slow-loading pages can lead to higher bounce rates and negatively impact your search engine rankings. In this blog post, we will explore some of the best practices for optimizing website performance to ensure faster loading times and a better overall user experience. 1. Image Optimization Images are often the largest assets on a webpage and can significantly impact loading times. To optimize images, consider the following techniques: Use the appropriate image format (JPEG for photographs, PNG for images with transparency, and SVG for vector graphics). Compress images to reduce file size while maintaining visual quality. Use responsive images and srcset to serve different image sizes based on the user's device. Lazy...

Understanding the Virtual DOM in React: How it Works and Benefits

Understanding the Virtual DOM in React: How it Works and Benefits Understanding the Virtual DOM in React: How it Works and Benefits React, developed by Facebook, is a popular JavaScript library for building user interfaces. One of the key features that contribute to its high performance and efficient rendering is the "Virtual DOM." In this blog post, we will delve into the Virtual DOM, exploring how it works and the benefits it brings to React applications. Understanding the Virtual DOM will give you valuable insights into how React efficiently updates the actual DOM, resulting in faster rendering and a better user experience. What is the Virtual DOM? The Virtual DOM is an abstraction of the actual DOM, maintained by React. It acts as a lightweight copy of the real DOM in memory, represented as a tree-like structure composed of React elements. When a React component renders, it creates a Virtual DOM representation of the component...

Exploring Different Concepts in React

Exploring Different Concepts in React Exploring Different Concepts in React React Fiber React Fiber is a reimplementation of the React reconciliation algorithm that was introduced in React 16. It is responsible for scheduling, rendering, and updating components in React. Fiber introduces a new approach to handle component updates and enables React to break rendering work into smaller units known as "fibers." This allows React to perform work incrementally and prioritize updates to provide a better user experience, including smoother animations, responsiveness, and the ability to pause and resume rendering work. Diffing Algorithm The diffing algorithm is a core concept in React that optimizes the process of updating the user interface. When a component's state or props change, React compares the previous virtual DOM (a JavaScript representation of the actual DOM) with the new virtual DOM to determine t...

10 Useful JavaScript Object Methods

10 Useful JavaScript Object Methods 10 Useful JavaScript Object Methods JavaScript objects are fundamental data structures that store key-value pairs. They come with built-in methods that provide powerful functionalities for manipulating and working with objects. In this post, we'll explore 10 useful JavaScript object methods with syntax and examples to help you become more efficient in your JavaScript development. 1. Object.keys() Return an array of the enumerable property names of an object. const vaibhavTiwari = { name: 'Vaibhav Tiwari', age: 30, country: 'India' }; const keys = Object.keys(vaibhavTiwari); console.log(keys); // Output: ['name', 'age', 'country'] 2. Object.values() Return an array of the enumerable property values of an object. const vaibhavTiwari = { name: 'Vaibhav Tiwari'...

React Server-Side Rendering (SSR): Benefits and Implementation

React Server-Side Rendering (SSR): Benefits and Implementation React Server-Side Rendering (SSR): Benefits and Implementation React is a popular JavaScript library for building dynamic user interfaces. By default, React renders components on the client-side, which provides a smooth and interactive user experience. However, as your application grows, client-side rendering (CSR) can lead to performance issues, especially for search engine optimization (SEO) and the initial page load. Server-Side Rendering (SSR) is an alternative rendering approach that addresses these challenges. In this blog post, we will explore the benefits of SSR and learn how to implement it in React applications. Benefits of Server-Side Rendering (SSR) Server-Side Rendering offers several advantages over traditional client-side rendering: Improved SEO: With SSR, search engines can crawl and index your web pages more effectively since the initial HTML content is alrea...

Introduction to Redux Toolkit: A Powerful Redux Simplification

Introduction to Redux Toolkit: A Powerful Redux Simplification Redux Toolkit: A Powerful Redux Simplification Redux Toolkit is a powerful library that simplifies the process of managing state in Redux applications. It provides a set of utilities and best practices to streamline the development process and enhance productivity. In this blog post, we'll explore the basics of Redux Toolkit, understand its syntax, compare it with plain Redux, discuss its future, and see how it handles Thunks and direct state manipulation. We'll also provide practical examples and code snippets to solidify your understanding. What is Redux Toolkit? Redux Toolkit is an official package from the Redux team that provides a set of utilities to simplify the common tasks of Redux development. It is designed to be the standard way to write Redux logic and aims to reduce boilerplate code while making the codebase more maintainable. Basic Syntax of Redux Toolkit ...

State Management in React: Redux vs MobX vs React Context

State Management in React: Redux vs MobX vs React Context State Management in React: Redux vs MobX vs React Context Introduction State management is a crucial aspect of building complex React applications. There are several popular solutions available to manage state effectively, including Redux, MobX, and React Context. In this blog post, we will compare these state management libraries, explore their use cases, advantages, and disadvantages, and provide code examples to understand how to implement state management in your React projects. Redux Overview Redux is a predictable state container for JavaScript apps. It maintains the state of an entire application in a single store, with the state being read-only and modified only through dispatched actions. Redux follows a unidirectional data flow pattern, making it easier to understand and debug application state changes. Use Cases Redux is an excellent c...